Honey Walnut Cream Cheese Spread

Tuesday, September 4, 2012

Looking for a perfect spread for breakfast?Honey Walnut Cream Cheese spread is a natural partner for bagels, breads and muffins. It is creamy,crunchy and just sweet that it will melt in your mouth.


Read More...

I love to start my day with a crispy toasted bagel but sometimes the question arises what am I going to spread on it today?


Cream cheese and bagels are a classic breakfast choice and my favorite. You can always buy cream cheese at your grocery store, but what if you want something more gourmet, something more flavorful? You can make homemade cream cheese spread of course!


This luscious Honey Walnut Cream Cheese spread is a natural partner for bagels, breads, muffins and more. Softened cream cheese is whipped together with honey and dash of walnuts.The sweetness of the honey mixes perfectly with the cream cheese with the nuts adding a little crunch.The creaminess, hint of sweetness and the crunch together make a melt-in-your-mouth combination.


Honey Walnut Cream Cheese Spread

Makes - 8 Servings

Cream Cheese - 8oz, softened
Honey - 3 - 4 tbsps
Brown Sugar - 2 - 3 tbsps
Walnuts - 1/2 cup chopped

In a bowl, combine softened cream cheese, honey, brown sugar, Whip together using an electric beater or hand blender until smooth and fluffy. Alternatively, you can blend in a food processor.

Add the chopped nuts and mix.

Chill in refrigerator until ready to serve.

Baklava

Sunday, June 24, 2012

Layers of delicately crispy phyllo pastry and sweet nut filling, kissed with honey syrup that is perfectly sticky and sweet.A bite of baklava will take your taste buds on a journey through several layers of eternal bliss from the delicate crispy buttery crust followed by chewy nuts held in place by thick syrup and a final layer of moist pastry.


Read More...

Light, flaky layers of crust and a sweet nutty filling, kissed with honey syrup. It is a piece of ambrosia dropped straight from heaven to the plate! Baklava truly is the dessert of the gods.


Baklava, a rich sweet made with layers of paperthin dough smothered with butter alternated with chopped nuts drenched in fragrant infused sugar syrup and baked to perfection. All those layers and layers of delicate crusty pastry, perfectly sticky & sweet honey syrup with the nuts is a heavenly treat.


I absolutely love the Baklava experience; from making to eating! While baking, I love the sweet aroma of the butter, sugar and nuts, it is so inviting. The crackling sound when pouring the syrup over hot golden brown Baklava hints to me that the pastry is soaking in the syrup and I am almost there! When it is cooled and the syrup soaked in, I lift a piece to my mouth and pause to savor the fragrance. Finally, I pop it into my mouth and the baklava experience is complete as the flavor pervades the palate.

A bite of baklava will take your taste buds on a journey through several layers of eternal bliss from the delicate crispy buttery crust followed by chewy nuts held in place by thick syrup and a final layer of moist pastry.

Baklava

Makes - 10 Servings
Phyllo Dough- 1 packet
Butter- 1 - 2 sticks melted
Honey Syrup Nut Filling
Sugar- 2 cups Pistachios- 2 cups
Honey- 1/3 cup Almonds- 1 cup
Water- 1 cup Sugar- 6 tbsps
Cinnamon- 1" stick
Rose water/orange peel
/lemon juice
- 1 tbsp (optional)

Thaw phyllo dough to room temperature.

Pre-heat oven to 350 F

Honey Syrup

In a pan combine sugar, water, honey and cinnamon. Boil on medium heat, stirring till the sugar melts and the syrup thickens. Remove from heat and let it cool.

You can add rose water or orange peel or lemon juice to the honey syrup for fragrance infused syrup.

Nut Filling

Place nuts and sugar in a blender or food processor and pulse it till the nuts are coarsely chopped. Keep aside.

Baklava

Trim the phyllo dough sheets to the size of 9 X 13 baking pan.

Brush the bottom and sides of the pan with melted butter; lay down a sheet of phyllo and brush with melted butter. Repeat this step 9 more times for a total of 10 sheets of phyllo.

Spread 1/2 the nut filling evenly over the phyllo sheet.

Layer 8 more sheets of phyllo with butter in between them.

Spread remaining nut filling over the phyllo sheet.

Top with 8 more sheets of phyllo, brushing each sheet with melted butter. Brush the top sheet with butter.

Using a sharp knife, gently cut phyllo layers into 2" squares or diamonds.

Bake baklava for 35- 45 minutes or until golden brown.

Remove baklava from oven and immediately pour the honey syrup over the baklava.

Allow it to cool for few hours and soak up the syrup.

Cut a piece of Baklava and enjoy the heavenly sensation!


Deep Fried Batter Balls

Saturday, May 5, 2012

Little delicious fluffy pillows with an appetizing golden brown color, a crispy exterior and a soft interior.They are a light, airy and fun to eat, you can never keep count of how many you ate!


Read More...

Fritter is any food coated in batter and deep-fried. How about just deep frying the batter? Different isn't it?

When batter is deep fried, they puff up into little delicious fluffy pillows. These little fried batter balls have an appetizing golden brown color with a crispy exterior and a soft interior.They are a light, airy and fun to eat, you can never keep count of how many you ate!

This is my back up recipe when I don't have anything at home to dip in the batter and make fritters! These babies are seriously perfect to make for a group of friends. Warm up your cool spring evening with a plateful of fried batter balls.


Deep Fried Batter Balls

Makes - 5-6 Servings

All purpose flour - 1 cup
Rice flour - ½ cup
Baking soda - a pinch
Yogurt - ½ cup
Onions - ¼ chopped
Green chillies - 3 chopped
Curry leaves - 3-4 (for added flavor, optional)
water - to make thick batter
Salt - to taste
Oil - for deep frying

Heat oil in a pan to about 350 F.

Take all the ingredients in a bowl, add water and mix together to form a thick batter. You want the batter thick enough to be able to scoop with a spoon.

First, test oil by dropping few drops of batter in the frying pan. Taste to make sure it is fully cooked.

Now, simply mound the batter on a teaspoon and drop the batter into the hot oil.

Fry in small batches in oil over medium heat for about 3-4 minutes or until a deep golden brown.

Drain on paper towel and serve immediately with tomato ketchup.

Chickpea Salad with Cilantro Lime Dressing

Thursday, April 5, 2012

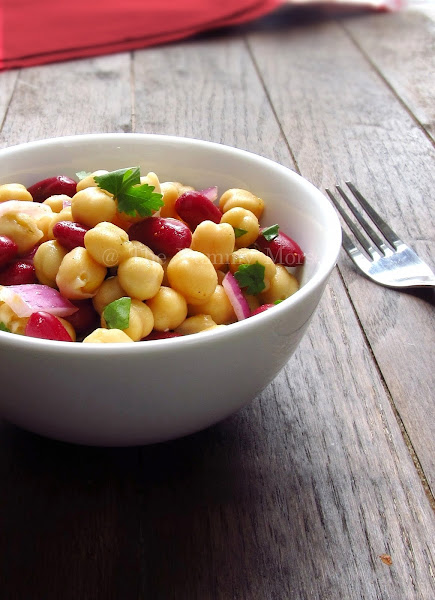
Chickpea Salad

What better way is there to start a meal than a refreshing, nourishing salad?Add a little panache to your daily meals with a delicious and satisfying chickpea salad


Read More...

What better way is there to start a meal than a refreshing, nourishing salad?


Chickpea Salad

Crisp and cool, salads are ideal and refreshing before a hearty meal. Add a little panache to your daily meals with a salad of mixed greens, legumes and elegant toppings.

Chickpea salad with cilantro lime dressing is one of my favorite side salads. The salad is delicious and satisfying. The cilantro lime dressing adds a fresh and refreshingly flavor. I add kidney beans to the mix for a nice contrast both visually and texturally. Also, I sprinkle a dash of chat masala for a sweet and tart flavor. Let the salad sit for an hour in the refrigerator to give time for the flavors to develop.


Chickpea Salad

A healthy and light salad. It is super fast and very easy to assemble and of all, no need to measure ingredients, just add to suit your tastes. This is a nice change from typical lettuce salads. A great dish to make ahead of time - the longer it sits the more flavorful it gets.

A great side salad you can't beat for taste and nutrition. A great salad to serve when you have company at home. I bet your company will not leave even a trace of salad!


Chickpea Salad with Cilantro lime dressing


Makes - 2 servings

Chickpea - 1 can
Kidney Beans - a handful
Lime Juice - ½ cup freshly squeezed
Cilantro - handful roughly chopped
Chat Masala - 1 tsp
Salt - to taste

Add washed and drained chickpea and kidney beans to a bowl.

Pour the lime juice, add cilantro and mix together.

Sprinkle Chat masala and mix. Taste and add salt if needed.

Cover with plastic wrap and keep in refrigerator.

Take it out 20 mins or so before you are ready to serve.

Enjoy!