Flavour of Thai

Sunday, December 19, 2010

Pad Thai

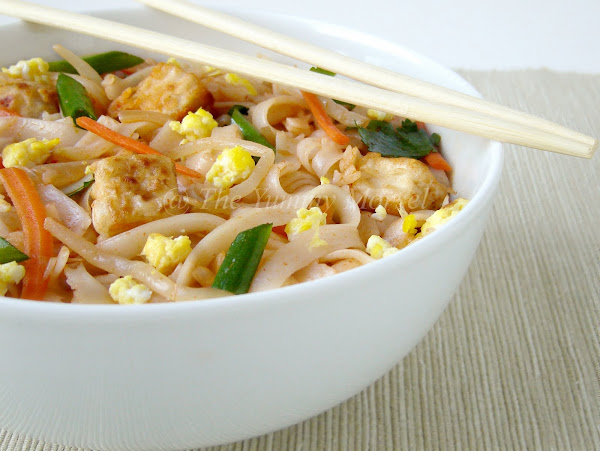
A dish of stir-fried rice noodles with (pad-thai) sauce and vegetables. The subtle blend of sauces, which when added to the noodles and vegetables creates a texture and taste that makes Pad Thai a lip-smacking experience.


Read More...

Thai cusine is one among my favorites. My liking for Thai food started when I visited Bangkok. My dad loves to take us on vacations and it was on one such vacation we were in Bangkok for a week. My brother being a foodie, we indulged in a lot of Thai food during our trip. One of my favorite was the ‘Tom Yum’ soup. Just love how they serve soup all through the meal. Certainly, the Thai Omelet needs a mention here. It was delicious! In US, there are plenty of Thai restaurants and I love the Thai fried rice and Pad Thai!


Pad Thai


I tried different Pad Thai recipes available on the web, after a lot of adaption, modification and experiments I was successful in making my version of Pad Thai at home!

Pad thai is a dish of stir-fried rice noodles with (pad-thai) sauce and vegetables. I like my sauce to lead with gentle sweet flavor, followed by a mild tanginess, and then a soft caress from the chilli at the end. In all, you can really taste the subtle blend of sauces, which when added to the noodles and vegetables creates a texture and taste that makes Pad Thai a lip-smacking experience.


For NoodlesFor Sauce
Rice Noodles- 1/2 of 12oz pack or 150 gmsSoy Sauce- 2tbsps
Egg- 2 medium scrambledRice Vinegar- 2 tbsps
Onions- 1/2 onion chopped
  lengthwise
Chili Sauce or
Sriracha Sauce
- 2 tbsps
Carrots- 1/2 cup shreddedTamarind Pulp- 2 tbsps
Cabbage- 1/2 cup shreddedBrown Sugar- 3 tbsps
Moong bean
Sprouts
- 1/2 cupOil- 2 tbsps
Salt- to taste
Tofu- 1 cup cubbed
Flour- 3 tbsps
Egg- 1 medium (beaten)


Actual Pad Thai sauce includes Fish Sauce as one of its ingredient. I personally don’t like the smell and taste of fish sauce so I omit it. If you are using fish sauce, use 1 – 2 tbsps and use half the tamarind pulp.

The secret to a tasty Pad Thai is the balance of the sweetness, sourness and spiciness in the sauce. So, be careful with the quantity of the ingredients as the taste and concentration of the ingredients vary from brand to brand.

Combine ingredients for the sauce in a bowl. Taste the sauce to check if the balance is alright.Set aside.

Pat tofu dry with a tissue or a cloth. Roll tofu in flour and dip them in beaten egg. Heat oil in a pan; fry the tofu in hot oil until crisp and brown. Set aside.

Cook the rice noodles as per the directions on the packet or on the box of the noodles. When it is done, drain the water and set aside

Usually, you cook rice noodles by placing it in hot water.

Heat oil on high in a heavy bottom pan.

Optionally you can substitute oil with Peanut oil for the peanuty taste.

When the oil is really hot add all the vegetables and stir-fry for 4-5 minutes or until soft but still crisp.

Flavors in the sauce blend very well with the noodles when this dish is prepared on high flame.

Add prepared tofu, scrambled eggs and fry for a few minutes.

Shrimp or chicken adds an extra meaty flavor and complements very well with the Pad Thai sauce.

Now add the rice noodles and some salt and stir it to mix them all together.

Add the prepared Pad Thai sauce little by little to make sure you are not adding too much of sauce.

Give the noodles a nice stir. Taste it and adjust the ingredients if required.

Remove from heat and serve hot.

A variant of Dosa!

Tuesday, December 7, 2010

Dosa is one of the staple South Indian breakfast and snack. A variant of traditionally dosa, prepared with besan flour/gram flour and finely chopped vegetables.


Read More...


Dosa is one of the staple South Indian breakfast or snack. Typically, Dosa is made of rice and lentils but there are lot of variants of Dosa that are prepared. One variant my mom makes is Besan Dosa.


Besan Dosa is prepared with besan flour/gram flour and finely chopped vegetables. Unlike other snacks made with besan flour like Pakora’s and Bajji’s which are deep fried, Besan Dosa requires very little or no oil for cooking. So, it is relatively a better choice.

Besan Flour- 2 cups
Onion- 1 medium finely chopped
Green Chilies- 3-4 chopped
Curry Leaves- 4-5 leaves
Turmeric- 1/2 Tsp
Chilli Powder- 1/2 Tsp (Optional)
Salt- to taste


Take besan flour in a bowl. Add salt, turmeric powder and chilli powder. Add chopped onions, green chilles, curry leaves and mix.

Now, gradually add water to make a batter of medium-thick consistency.

Heat a skillet or a pan. When it is hot pour a ladle full of batter on to the pan and spread it in a circular motion, nice and thin. Pour a few drops of oil on the top and to the sides of the dosa.

After a few minutes, small bubbles will appear on the surface of the dosa and the bottom of the dosa will begin to turn brown. At this time, flip the dosa on to the other side and cook until it starts to brown.

Remove it from the pan on to a plate and serve hot with your choice of chutney.

This is my entry to MLLA # 30 started by Susan.

Curried Omelet

Wednesday, November 17, 2010

Serving egg omelet as a side? Why not cut it into pieces and drop it into the curry. The omelet pieces soak up the curry and become soft and juicy. Every piece of omelet blended with curry is a taste that will make you come back for more.


Read More...

This is a dish from my childhood. My mom often made this when she made curry for dinner. Instead of serving egg omelet as a side, she would cut it into pieces and drop it into the curry. She would let it soak in the curry for a bit and then serve it hot at the dinner table. The curried egg omelet is so delicious that I could not get enough of it every time I had this dish.


The curry is prepared with spicy onion-tomato-coconut base. Sautéed onion-tomato cooked along with coconut and spices, exude a unique flavor that is hearty and comforting. The whiff of cloves, and cinnamon are beautifully married to give the unassuming curry the flavor and aroma. The omelet pieces soak up the curry and become soft and juicy. Every piece of omelet blended with curry is a taste that will make you come back for more.

Onions- 2 medium chopped
Tomatoes - 2 chopped
Coconut- 5 tbsps grated
Chili Powder- 1 tsp
Garam masala- 2-3 tbsps
Turmeric Powder- 1 tsp
Corriander Powder- 1 tsp
Ginger Garlic- 1 tbsp paste
Green Chilies- 4 chopped
Cinnamon- one-inch stick
Cloves- 4 cloves
Bay leaf- 1-2 leaves
Oil- 6 tbsps or as much as you want!
Cilantro- for garnish
Eggs- 2


Grind the coconut in a blender and set aside.

Heat oil in a pan and add cinnamon, cloves and bay leaf. Sauté for a few seconds till it flavors the oil.

Add ginger garlic paste, green chilies and fry for a few seconds.

Add chopped onion to the pan and cook until soft and translucent.

Add chopped tomatoes to the onions and cook until tomatoes are soft and puréed.

Add turmeric powder, chili powder, corriander powder, garam masala, salt and continue cooking for sometime.

You can use any Masala of your choice; Garam Masala, Curry Powder. I use a combination of Garam Masala and Kitchen King Masala.

When the curry is almost done, add the coconut and cook for a few minutes.

Taste the curry and adjust the spices and salt, as you like. Add some water if the curry is too thick.

You want to keep the curry a little watery and not too thick because the omelet pieces will absorb the curry making it thick.

Remove from flame and keep aside.

Prepare egg omelet, as you would normally make. Roll the omelet, cut into medium size pieces, and drop it into the hot curry. Garnish with a bunch of cilantro.

By the time, you clean up and set the dinner table, the omelet pieces would be soaked up and ready!

Serve hot with rice or rotis.


This is my entry to the event 'Dish Name Starts with C' hosted by Akila of Akila's Kitchen

Soup for Fall !!

Friday, October 29, 2010

Easy to prepare and delicious to taste, tomato soup is a preferred choice for all taste buds. Trust me; a bowl of soup can be your best friend this season.


Read More...

With the onset of cold weather, my heart (and tummy) is craving for something warm and soothing. I cannot think of a more perfect meal than a comforting, big bowl of hot soup. Soup is the best thing! They make the perfect meal for the cool days of fall. Soup warms the body and the spirit.


This cream of tomato soup is a rich, smooth, creamy, mildly seasoned soup. It is a thick soup of vine-ripened tomatoes and generous dose of cream. A smooth blend of cream combined with tomatoes, vegetable stock, herbs and finely chopped onion create a creamy tomato soup. This simple classic is warm, soothing and luscious!

A soup can be a great addition to the fall and winter dining table. Easy to prepare and delicious to taste, tomato soup is a preferred choice for all taste buds. Trust me; a bowl of soup can be your best friend this season!


This recipe makes approximately 4 servings. You can tweak the quantities of the ingredients as per your taste.

Diced Tomato- 2 cups
Onions- 1 chopped
Cream - 2 cups
Vegetable broth- 2 cups
Butter- 6 tbsp
Flour- 4tbsps
Parsley- 3 sprigs
Bay leaf- 1 leaf
Garlic- 4 cloves minced
Pepper- to taste
Salt- to taste


Melt butter in a pot. Add garlic, onions and sauté till translucent.Add flour and stir for few minutes.

Add the diced tomatoes, vegetable stock, bay leaf, parsley and cook on medium heat for about 30 minutes.

You can use any flavorful culinary herb of your choice instead of parsley. And as a substitute to vegetable broth, you can use chicken broth to give extra flavor

Remove from heat and cool. Discard the parsley, bay leaf from the soup and purée the soup in a blender.

Pour the purée into the pot and place it back on heat. Add cream and cook until the soup thickens.

Sprinkle some parsley and freshly cracked pepper, and serve with French Baguette.

Bubbles Pudding !!!

Wednesday, October 13, 2010

Bubbles Pudding is sweet milk based dessert with a creamy texture and flavor. A quick, healthy, and easy dessert. A dessert that tastes both familiar and exotic.


Read More...

Summer has passed, the days are becoming shorter, nights are getting colder, and leaves are changing color. Fall is here! Bubbles pudding is one of the best desserts during the transition from one season to another. Serve warm in fall and winter, serve chill in spring and summer, either way it tastes scrumptious.


Bubbles Pudding is sweet milk based dessert with a creamy texture and flavor. It uses tapioca pearls also known as Sabudana or Sago pearls combined with the milk to makes a luscious dessert. The tiny bubbles of the tapioca pearls give the pudding a unique texture, like tiny bubbles surrounded by a creamy sauce. This pudding requires a little attentiveness and careful stirring. Otherwise, it is a quick, healthy, and easy dessert. A dessert that tastes both familiar and exotic.

This is one of my favorite desserts growing up; I called it ‘Bubbles Pudding’! My mom would make it specially for me. Something about it makes me feel comforted, the chewiness of the bubbles and the creaminess of the pudding. The cardamom and vanilla flavor of the pudding makes me long for it.


This recipe makes approximately 3 to 4 servings. You can always modify the quantity of the ingredients according to your taste.

Tapioca Pearls - 1 cup
Milk/Cream - 2-3cups
Sugar - 8 tbsps
Cardamom Powder
- 1 tsp
Vanilla essence - 1 tsp
Pistachios - for garnish
Raisins - for garnish


Heat 3-4 cups water in a heavy bottomed vessel and add tapioca pearls.

Cook the tapioca pearls until slightly soft and transparent. You do not want to cook it completely.

Remove from heat, drain and rinse with cold water to remove the excess starch. Then, place it back on heat.

Tapioca pearls get starchy as it cooks. I prefer cooking it in water because I can drain and rinse of the excess starch. This gives the pudding a better texture.

Now add milk, sugar, and cook on low until the milk is absorbed, the pudding thickened, and most of the tapioca pearls are completely transparent. Some of them might still have a white dot at the centers but that is all right.

It is important to stir constantly (a slow, gentle stir) and cook at a low temperature to avoid scorching.

At this point, add cardamom powder, vanilla essence, and continue stirring for a few minutes.

Remove from heat and cool.

Serve warm or chill with nuts and raisins on top as garnish.

All Time Classic

Friday, September 24, 2010

Dal is a traditional Indian dish prepared by cooking lentils with vegetables and spices. This simple yet delicious Dal is a pleasure to the palette.


Read More...

A common item on the menu and an all time classic at our home is Dal. I think it is pretty much the same in lot of Indian homes.Dal is a traditional Indian dish prepared by cooking lentils with vegetables and spices. There is a wide variety of lentils available and can be used to make Dal. Rich content of protein and fiber in lentils makes Dal a nutritious dish.


Here is a simple Dal recipe my mom makes at home. Channa dal cooked with onions, veggies and coconut paste to a creamy consistency. The blend of coconut tempered with a touch of mild spices gives the dal its unique flavor. This simple yet delicious Dal is a pleasure to the palette.

Channa Dal- 1 cup
Coconut - 2 tbsp grated
Onion- 1 small chopped
Potato- 1 cup diced
Carrot- 1/4 cup diced
Green Peas- 1/4 cup
Green chilies- 4-5
Cloves- 3 cloves
Bay leaf- 1 small
Turmeric- 1 tsp
Ginger Garlic Paste- 1 tsp
Cilantro- for garnish


Place channa dal and 2 cups of water in a pressure cooker, cook for 2 -3 whistles. If cooking over stove top, cook dal until soft.

Mash the dal and keep aside.

Grind the coconut to a fine powder/paste in a blender and keep aside.

You can substitute 1/4 cup of coconut milk for coconut paste.

Heat some oil in a heavy bottom vessel.Add cloves, bay leaf, green chilies and ginger garlic paste and fry for a minute until it flavors the oil.

Add chopped onions and fry until it is cooked and translucent.Add the diced potatoes, carrots and green peas and cook until done.

Since it takes a while to cook potatoes, I pre-cook them before adding it to the onions. You can cook them on stove or in a microwave. You can do the same for carrots and green peas as well.

Add mashed dal, coconut powder/paste, turmeric, salt and stir well. If the Dal is too thick add some water to it.

Bring it to boil on simmer (low-heat), stirring frequently.

Turn off the heat, garnish with cilantro. Serve with rice or rotis.

This is my entry to Susan's My Legume Love Affair 27

Guilty Food Pleasure!

Saturday, September 4, 2010

Fettuccine Alfredo is an Italian pasta dish prepared with fettuccine tossed in a cheesy sauce. It is super fatty and super tasty!


Read More...

All of us have at least one guilty food pleasure. Something we love and enjoy eating despite feeling guilty for enjoying it! Fettuccine Alfredo is one such dish for me. Fettuccine Alfredo is an Italian pasta dish prepared with fettuccine tossed in a cheesy sauce. It is super fatty and super tasty!


I have had Fettuccine Alfredo at Olive Garden and Macaroni Grill quite a few times but it never occurred to me until few months back that I must mimic this at home! Recollecting the taste of the sauce, I gathered my ingredients for this sinful goodness!

My Fettuccine Alfredo turned out to be a perfect pairing of rich, creamy sauce and perfectly cooked pasta. Parmesan cheese combined with butter and cream formed a smooth and rich sauce. My selection of using chives was just right. It provided a mild, aromatic onion flavor without overpowering the dish. Hot fettuccine pasta tossed along with a creamy sauce, fresh herbs, and seasoned with dash of pepper is one mouth-watering dish.

I realized I could prepare a low fat version of this dish and retain most of the taste and creaminess. Now, my guilty pleasure will not be guilty anymore!


Fettuccine- 1/2 lb or 1/2 box
Cream- 2 cups
Butter- 1/2 stick or 4 Tbsp
Parmesan Cheese- 1 cup (grated)
Chives- 2 Tbsp (Optional)
Pepper- to taste
Salt- to taste

Cook fettuccine as per the directions on the box.

To prepare the sauce, heat a saucepan to medium-hot.

Melt the butter. Then, pour the cream and gently stir until it all warms up.

Depending on how you like your Fettuccine Alfredo,dry or with sauce, alter the quantity of cream used.

Add parmesan cheese to the creamy butter sauce. As the cheese melts, the sauce will thicken.

Now, add chives, pepper, and stir.

Chive is a type of herb that belongs to the Onion family. It carries a mild onion flavor. You can replace Chives with your favorite herb.

Remove from heat.

Add fettuccine to the pan and toss, making sure the pasta is completely coated with the creamy sauce.


Serve with grated parmesan cheese on top along with salad, bread sticks and a glass of wine.


Perfect Summer Dessert!

Saturday, August 21, 2010

Mango pie is a delightful blend of tropical mango and cream cheese. The bright yellow color, the intense fruity flavor and refreshing taste of mango will take your senses to Paradise.


Read More...

Mango pie is a delightful blend of tropical mango and cream cheese. It is light yet creamy dessert with a smooth texture. You can taste the exotically sweet and tart flavor of the delectable mango in every bite.

Mango pie is the perfect summer dessert. The bright yellow color, the intense fruity flavor and refreshing taste of mango will take your senses to Paradise. Needless to say, Mango is the super fruit. From sweet to spicy, there is a mango recipe to please any palatte.

My colleague Geetha brought this dessert to our office party and I absolutely loved it on the very first bite. I must say parties are great places to taste new recipes. Soon after the party, I went to her desk, if you are asking for what, for the recipe of course!

Light, creamy and cool, with a fresh mango flavor, it is the perfect no-cook, no-bake dessert. The best part is that it takes less than 10 minutes to prepare and uses only a few ingredients.

Pie crust- 1
Mango pulp- 3-4 Cups or 3/4 of 30oz tin
Cream cheese- 1 8oz block
Gelatin- 1 small pkt or 1-2 Tbsps (use more for extra firm)
Sugar- as required

To start, thaw the cream cheese.

You can substitute cream/milk and condensed milk for cream cheese. You might need 1/2 cup of condensed milk and 1/2 cup of milk/cream.

Heat 1/2 cup of water and stir in gelatin powder. Stir until it dissolves. Cool it to room temperature.

Gelatin is a substance used to provide a firm consistency. I use 1 to 1 1/2 packets of gelatin. I have not made the pie using condensed milk so I would say two packets for the first time. Depending on the firmness, you can adjust it for the next time.

Combine cream cheese, mango pulp and gelatin liquid and beat it in a blender.

Taste the mango mixture before adding sugar as mango pulp contains good amount of sugar. If sweetened condensed milk is used, sugar might not be required.

I use the mango pulp tin available in Indian store. If you do not get ready-made mango pulp, you can buy good mangoes and make the pulp at home.

Pour the mango mixture into the piecrust and refridgerate for 4-5 hours or until it sets.

If you do not have pie crust, you can omit it. You can pour the mango mixture into any medium-shallow dish and refrigerate it.

Your mango pie is ready!

Gooey Quesadilla !!!

Sunday, July 25, 2010

Quesadilla

Quesadillas are one of those wonderful dishes that can be prepared with pretty much anything you have on hand. As long as you have a few tortillas at home, there can be no excuse for not making them.


Read More...

Quesadillas are one of those wonderful dishes that can be prepared with pretty much anything you have on hand. As long as you have a few tortillas at home, there can be no excuse for not making them!

Quesadilla is tortilla folded in half to sandwich a cheesy filling and browned or grilled on both sides until crisp.

Quesadilla


We enjoy Mexican food a lot. So, I normally have tortillas and black beans at home to cook up a quick Mexican meal on weeknights. One of my favorite weeknight fix is gooey quesadilla! It is easy and convenient to make, light and delicious to taste.

I usually make a black bean and corn quesadilla. Black beans are a good source of fiber and protein. Sometimes, I throw in a few veggies like bell pepper or Jalapeno. To make my quesadillas nice and gooey, I use two kinds of cheese - mozzarella and cheddar, or Mexican Cheese.The crispy tortilla filled with beans and crunchy veggies, oozing with melted cheese is one tasty combination.

Few filings you can try are caramelized onions with bell pepper, grilled chicken, sautéed mushrooms and onions, and Paneer. Sometimes, I make Desi style Quesadilla when I have left over curries at home!

To fill four tortillas, you will need:

Black beans- 1 Can
Corn- 1 Can
Green Bell Pepper- 1 medium size chopped
Red Bell Pepper- 1 medium size chopped
Lemon juice- 1-2 Tbsp (Optional)
Cheddar cheese- 2 cups shredded
Mozzarella cheese- 1 cup shredded


To prepare the filling, rinse the can of black beans and corn thoroughly to remove all the liquid. Put them in a bowl.

Add the chopped peppers and lemon juice, and give it a nice mix.

Now to make the quesadilla, heat a pan on medium to medium-high heat. When hot, spray some cooking oil spray or add some oil, place a tortilla in the pan, and flip it a couple of times until it becomes warm and is coated with oil.

If you do not get tortilla in the area where you live, you can try using chapatti. I have not tried it with Chapatti though!

Place a portion of the filling on one-half of the tortilla. Sprinkle generous amount of cheese over the filling.

Fold the other half of the tortilla onto the filling. You should now have a tortilla in half moon shape!

Let it cook until the bottom side starts to turn light brown and the cheese inside melts. Then, carefully flip the tortilla to the other side and cook until light brown and crispy.

Keep checking the bottom of the tortilla to avoid burning it!

Remove the quesadilla from the pan onto a serving plate. Repeat the same for all the tortillas.


Quesadilla


Cut the quesadilla into wedges and enjoy every bite of the gooey quesadilla with salsa and sour cream!


Cool way to beat the summer heat

Sunday, July 11, 2010

What else can say summer better than a chilled glass of iced tea? A fruity strawberry flavored iced tea, with tang of lemon and a touch of mint.


Read More...

Summer is here and the heat outside is cranking up. With a 100 F outside, it’s time to combat the sweltering heat of the summer sun with a refreshing glass of iced tea! What else can say summer better than a chilled glass of iced tea?

Strawberry Iced Tea

I think iced tea is a summer time classic and an icon of refreshment. Don't you think? The best thing about iced tea is you can prepare it in so many different flavors; strawberry, cranberry, rasberry, orange, lime, mint and more. It is so light 'n' refreshing and helps you stay cool and hydrated.

Here is a simple recipe for a fruity strawberry flavored iced tea, with tang of lemon and a touch of mint. This recipe makes a serving size of 2 glasses (like the one in the photo). You can change the quantities of the ingredients to match your taste.

Water- 2 glasses
Tea bags- 1-2 instant tea bags
Sugar - usually 6-7 Tsp
Strawberries- 2- 3 cups of frozen strawberries
Lemon juice- 2-3 Tbsps
Mint leaves- 4-5 leaves


Bring 2 glasses of water to boil. Remove from heat and dip the tea bags in hot water. Let it stand for 5-8 minutes. Then remove the tea bags and dispose it.

Depending on how strong you like your tea, use 1 or 2 tea bags. I usually make it strong considering the factor that the ice cubes will dilute the tea as they melt.

Add desired amount of sugar to the brewed tea.

Add lemon juice to the brewed tea. You can use freshly squeezed juice or lemon juice concentrate or lemonade.

Now, for the strawberry flavor, thaw the frozen strawberries. When they come to room temperature, mash them with the back of a ladle or give it a quick pulse in the blender to make a puree. Add the puree to the brewed tea and give it a nice stir.

You can use fresh strawberries as well. I prefer frozen ones as they are already cut and are easy to mash. If you don’t want to go through the process of preparing the puree, you can use strawberry syrup or any other fruit flavored syrup of your choice. You might need about 4-5 Tbsps.

Add a few mint leaves to spice up the flavor.

Cover and chill in the refrigerator for a few hours.

When it’s time for a soothing glass of iced tea, remove the tea from the fridge, pour it into a glass using a strainer to filter out any particles of the puree. Pop a few ice cubes into the glass, sit back and relax sipping your iced tea!