Minestrone Soup - Cold weather, Hot soup!

Tuesday, December 4, 2012

Perfect cold weather fare that warms up and satisfies the soul on a chilly day. Packed with vegetables, quick-to-fix and nutritious, this soup is a meal in itself!


Read More...

What cold weather fare comforts and warms the soul more than soup? It's the perfect belly-warmer for the chilly days, and just holding a hot bowl of soup thaws out chilled hands.

Brimming with a harvest of vegetables, minestrone soup is a quick-to-fix soup fresh-tasting and nutritious. The tomato-based broth is full of everything from carrots and celery to beans and elbow macaroni. It is a versatile recipe that you can alter to fit whatever's in your pantry. Make it hearty or light; keep it vegetarian or not -- it's up to you. Just sauté the veggies, add broth, tomatoes and season with your favorite herbs and spices and simmer until the vegetables are tender.

I always make a big pot of this easy minestrone soup because it’s simple to put together and the flavor is so wonderful.I could eat it for lunch and dinner all week long, and I usually do. Packed with vegetables, beans and pasta, this soup is a meal in itself.

A hot bowl of minestrone soup is both mouth-watering and soul satisfying.


Minestrone Soup

Makes - 4 servings

  
Carrots - 1 cup chopped Bay leaf - 2
Green Beans - 1/2 cup choppedGarlic - 2
Celery - 1/2 cup chopped Salt - to taste
Onion - 1/2 cup chopped Pepper - to taste
Cannellini Beans- 1/2 cup Parmesan cheese - 1 cup (optional)
Elbow Pasta - 1 cup cooked Olive Oil - 1 tbsp
Diced Tomato - 1 cup
Tomato Paste - 1/4 cup
Chicken/Vegetable Broth - 4 cups

In a large pot, heat oil over medium high heat.

Add garlic and onion and cook until translucent.

Add broth, tomato paste, celery, carrots, beans, bay leaf, and tomatoes and cook for 20 to 30 minutes, until vegetables are tender.

You can use vegetables of your choice and quantity. Sometimes, I like to add cabbage, zucchini, spinach and additional seasoning like parsley, oregano or basil to the soup.

Add cannellini beans, pasta and simmer for another 20 minutes.

Season with salt and pepper.

Ladle soup into bowls and serve with Parmesan cheese sprinkled over the top.


Honey Walnut Cream Cheese Spread

Tuesday, September 4, 2012

Looking for a perfect spread for breakfast?Honey Walnut Cream Cheese spread is a natural partner for bagels, breads and muffins. It is creamy,crunchy and just sweet that it will melt in your mouth.


Read More...

I love to start my day with a crispy toasted bagel but sometimes the question arises what am I going to spread on it today?


Cream cheese and bagels are a classic breakfast choice and my favorite. You can always buy cream cheese at your grocery store, but what if you want something more gourmet, something more flavorful? You can make homemade cream cheese spread of course!


This luscious Honey Walnut Cream Cheese spread is a natural partner for bagels, breads, muffins and more. Softened cream cheese is whipped together with honey and dash of walnuts.The sweetness of the honey mixes perfectly with the cream cheese with the nuts adding a little crunch.The creaminess, hint of sweetness and the crunch together make a melt-in-your-mouth combination.


Honey Walnut Cream Cheese Spread

Makes - 8 Servings

Cream Cheese - 8oz, softened
Honey - 3 - 4 tbsps
Brown Sugar - 2 - 3 tbsps
Walnuts - 1/2 cup chopped

In a bowl, combine softened cream cheese, honey, brown sugar, Whip together using an electric beater or hand blender until smooth and fluffy. Alternatively, you can blend in a food processor.

Add the chopped nuts and mix.

Chill in refrigerator until ready to serve.

Baklava

Sunday, June 24, 2012

Layers of delicately crispy phyllo pastry and sweet nut filling, kissed with honey syrup that is perfectly sticky and sweet.A bite of baklava will take your taste buds on a journey through several layers of eternal bliss from the delicate crispy buttery crust followed by chewy nuts held in place by thick syrup and a final layer of moist pastry.


Read More...

Light, flaky layers of crust and a sweet nutty filling, kissed with honey syrup. It is a piece of ambrosia dropped straight from heaven to the plate! Baklava truly is the dessert of the gods.


Baklava, a rich sweet made with layers of paperthin dough smothered with butter alternated with chopped nuts drenched in fragrant infused sugar syrup and baked to perfection. All those layers and layers of delicate crusty pastry, perfectly sticky & sweet honey syrup with the nuts is a heavenly treat.


I absolutely love the Baklava experience; from making to eating! While baking, I love the sweet aroma of the butter, sugar and nuts, it is so inviting. The crackling sound when pouring the syrup over hot golden brown Baklava hints to me that the pastry is soaking in the syrup and I am almost there! When it is cooled and the syrup soaked in, I lift a piece to my mouth and pause to savor the fragrance. Finally, I pop it into my mouth and the baklava experience is complete as the flavor pervades the palate.

A bite of baklava will take your taste buds on a journey through several layers of eternal bliss from the delicate crispy buttery crust followed by chewy nuts held in place by thick syrup and a final layer of moist pastry.

Baklava

Makes - 10 Servings
Phyllo Dough- 1 packet
Butter- 1 - 2 sticks melted
Honey Syrup Nut Filling
Sugar- 2 cups Pistachios- 2 cups
Honey- 1/3 cup Almonds- 1 cup
Water- 1 cup Sugar- 6 tbsps
Cinnamon- 1" stick
Rose water/orange peel
/lemon juice
- 1 tbsp (optional)

Thaw phyllo dough to room temperature.

Pre-heat oven to 350 F

Honey Syrup

In a pan combine sugar, water, honey and cinnamon. Boil on medium heat, stirring till the sugar melts and the syrup thickens. Remove from heat and let it cool.

You can add rose water or orange peel or lemon juice to the honey syrup for fragrance infused syrup.

Nut Filling

Place nuts and sugar in a blender or food processor and pulse it till the nuts are coarsely chopped. Keep aside.

Baklava

Trim the phyllo dough sheets to the size of 9 X 13 baking pan.

Brush the bottom and sides of the pan with melted butter; lay down a sheet of phyllo and brush with melted butter. Repeat this step 9 more times for a total of 10 sheets of phyllo.

Spread 1/2 the nut filling evenly over the phyllo sheet.

Layer 8 more sheets of phyllo with butter in between them.

Spread remaining nut filling over the phyllo sheet.

Top with 8 more sheets of phyllo, brushing each sheet with melted butter. Brush the top sheet with butter.

Using a sharp knife, gently cut phyllo layers into 2" squares or diamonds.

Bake baklava for 35- 45 minutes or until golden brown.

Remove baklava from oven and immediately pour the honey syrup over the baklava.

Allow it to cool for few hours and soak up the syrup.

Cut a piece of Baklava and enjoy the heavenly sensation!


Deep Fried Batter Balls

Saturday, May 5, 2012

Little delicious fluffy pillows with an appetizing golden brown color, a crispy exterior and a soft interior.They are a light, airy and fun to eat, you can never keep count of how many you ate!


Read More...

Fritter is any food coated in batter and deep-fried. How about just deep frying the batter? Different isn't it?

When batter is deep fried, they puff up into little delicious fluffy pillows. These little fried batter balls have an appetizing golden brown color with a crispy exterior and a soft interior.They are a light, airy and fun to eat, you can never keep count of how many you ate!

This is my back up recipe when I don't have anything at home to dip in the batter and make fritters! These babies are seriously perfect to make for a group of friends. Warm up your cool spring evening with a plateful of fried batter balls.


Deep Fried Batter Balls

Makes - 5-6 Servings

All purpose flour - 1 cup
Rice flour - ½ cup
Baking soda - a pinch
Yogurt - ½ cup
Onions - ¼ chopped
Green chillies - 3 chopped
Curry leaves - 3-4 (for added flavor, optional)
water - to make thick batter
Salt - to taste
Oil - for deep frying

Heat oil in a pan to about 350 F.

Take all the ingredients in a bowl, add water and mix together to form a thick batter. You want the batter thick enough to be able to scoop with a spoon.

First, test oil by dropping few drops of batter in the frying pan. Taste to make sure it is fully cooked.

Now, simply mound the batter on a teaspoon and drop the batter into the hot oil.

Fry in small batches in oil over medium heat for about 3-4 minutes or until a deep golden brown.

Drain on paper towel and serve immediately with tomato ketchup.

Chickpea Salad with Cilantro Lime Dressing

Thursday, April 5, 2012

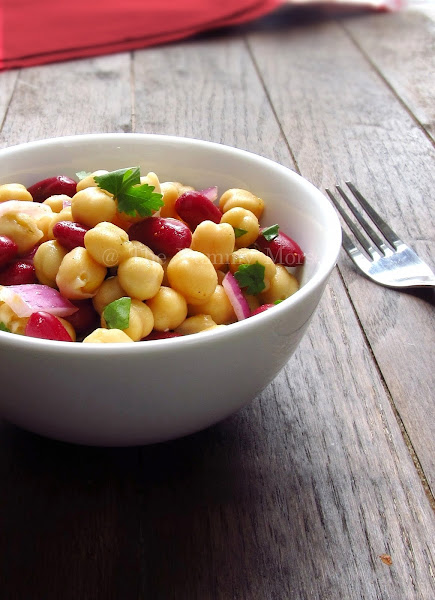
Chickpea Salad

What better way is there to start a meal than a refreshing, nourishing salad?Add a little panache to your daily meals with a delicious and satisfying chickpea salad


Read More...

What better way is there to start a meal than a refreshing, nourishing salad?


Chickpea Salad

Crisp and cool, salads are ideal and refreshing before a hearty meal. Add a little panache to your daily meals with a salad of mixed greens, legumes and elegant toppings.

Chickpea salad with cilantro lime dressing is one of my favorite side salads. The salad is delicious and satisfying. The cilantro lime dressing adds a fresh and refreshingly flavor. I add kidney beans to the mix for a nice contrast both visually and texturally. Also, I sprinkle a dash of chat masala for a sweet and tart flavor. Let the salad sit for an hour in the refrigerator to give time for the flavors to develop.


Chickpea Salad

A healthy and light salad. It is super fast and very easy to assemble and of all, no need to measure ingredients, just add to suit your tastes. This is a nice change from typical lettuce salads. A great dish to make ahead of time - the longer it sits the more flavorful it gets.

A great side salad you can't beat for taste and nutrition. A great salad to serve when you have company at home. I bet your company will not leave even a trace of salad!


Chickpea Salad with Cilantro lime dressing


Makes - 2 servings

Chickpea - 1 can
Kidney Beans - a handful
Lime Juice - ½ cup freshly squeezed
Cilantro - handful roughly chopped
Chat Masala - 1 tsp
Salt - to taste

Add washed and drained chickpea and kidney beans to a bowl.

Pour the lime juice, add cilantro and mix together.

Sprinkle Chat masala and mix. Taste and add salt if needed.

Cover with plastic wrap and keep in refrigerator.

Take it out 20 mins or so before you are ready to serve.

Enjoy!


Cilantro Lime Rice and Black Beans

Saturday, February 25, 2012

Cilantro Lime Rice

Fluffy white rice tossed with fresh squeezed lime juice and chopped cilantro.A great blend of flavors that give a soothing and comforting taste.


Read More...

Delicious, slightly tangy, basmati rice with a touch of cilantro.A great blend of flavors that give a soothing and comforting taste. Fresh lime juice wake up your taste buds and cilantro jazz up the white rice to create an outstanding rice dish.

My love for this dish started here......

Cilantro Lime Rice

Friday nights are almost often eat-out nights! Its the end of the work week so we are tired but we are in mood to eat something tasty (of course!), healthy(yeah right!) and satisfying. By default, our friday night eat out place is Chipotle. We loooooove the burrito bowl and my favorite part is cilantro lime rice.

Burrito bowl is black beans layered on a bed of Cilantro lime rice, with a serving of grilled meat or veggies, topped with pica de gallo, a dollop of sour cream and guacamole served in a bowl.

Cilantro Lime Rice

Fluffy white rice is tossed with fresh squeezed lime juice and chopped cilantro. The tangy lime infused basmati rice is mild yet flavorful. Seasoned black beans add a nice bite and the extra kick to the dish. This light, healthy and hearty dish is the perfect choice for any meal.


Cilantro Lime Rice

Cilantro Lime Rice and Black Beans

Makes - 2 Servings


Cilantro Lime RiceBlack Beans
Basmati Rice - 4 cups cookedBlack Beans - 1 can
Lime Juice - 1/2 cupVegetable broth - 2 cups
Cilantro - a handful roughly choppedCumin - 1 tsp
Oil - 2 tbspOil - 2 tbsp
Salt - to tasteSalt - to taste

Heat oil in a pan.

Stir in rice, lime juice and cilantro.

Add salt and stir till the rice is heated through.

In another pan, heat oil.

Add the vegetable broth, black beans, cumin and salt.

Let it boil for few minutes till the broth thickens a little.

Now layer some cilantro lime rice in a bowl, top with some black beans,pica de gallo or corn salsa and serve with dollop of sour cream.

Gobi Manchurian

Tuesday, February 7, 2012

Gobi Manchurian

A popular Indian Chinese dish that is guaranteed to tickle your taste buds. Deep fried fritters tossed in sweet n spicy sauce and stir-fried on high heat.


Read More...

I remember the time when Hot n Sour soup, Fried rice, Hakka noodles,Gobi Manchurian, Schezuan Paneer started to appear on restaurant menu cards. These Indian Chinese dishes were so well accepted that it gained popularity in no time. Today, the Indo-Chinese food has become an integral part of the Indian culinary milieu. Now, every eating joint in India, big or small, carry a wide range of Indo-Chinese dishes in their menu.

Gobi Manchurian

Fusion of Indian ingredients and Chinese seasoning and techniques resulted in this winning combination!These dishes are prepared with basic ingredients of an Indian dish like onions, garlic, ginger, chillis but instead of adding Garam masala, Soy sauce and Vinegar are added!

Gobi Manchurian

A popular dish amongst them is Manchurian. Deep fried fritters tossed in Manchurian sauce and stir-fried on high heat. Instead of plain flour batter, a batter seasoned with chili sauce and ginger garlic paste is used. The sauce contains caramelized onions, bell peppers, and ketchup and for the 'Chinese' flavor, an overdose of chilli sauce, garlic and ginger, and generous portions of soy sauce and vinegar is added to top it all off .

Gobi Manchurian

Manchurian is bold, vibrant and has varied flavors. It has a nice balance of sweet, tang and spice all in one bite! It is a tantalizing dish that is guaranteed to tickle your taste buds!


Gobi Manchurian

Makes - 4 Servings


Manchurian Sauce Batter for Fritters
Spring Onion - 2 bunchesCauliflower - 2 cups of florets
Bell Pepper - 1/2 cup choppedFlour - 1/2 cup
Ginger - 1 tbsp choppedCorn Flour - 1/2 cup
Garlic - 1 tbsp choppedGinger Garlic Paste - 1/2 tsp
Sriracha Sauce or
any Red Chili sauce
- 1 tbspSriracha Sauce or
any Red Chili sauce
- 2 tbsp
Tomato Paste - 3 tbspSalt - to taste
Tomato Ketchup - 2 tbspwater - as needed
Soy Sauce - 2 tbsp
Vinegar - 2 tbsp
Brown Sugar - 1 – 2 tsp
Salt - to taste

Mix all the ingredients under 'batter for fritters' except cauliflower to make a thick batter.

Heat oil in a pan over medium-high heat for deep frying.

Working in batches, dip cauliflower florets in batter, then fry until golden brown, about 4 to 5 minutes. When done remove fritters from the pan to a plate lined with paper towels.

You can use Mushrooms, Paneer, Chicken, Fish or anything of else your choice for this dish

Mix all ingredients under 'Manchurian Sauce' except onions, bell pepper, ginger and garlic. Keep aside.

Heat oil in a wok or a pan.

Add chopped ginger and garlic and saute till it flavors the oil.

Add chopped spring onions and saute for a few minutes till soft and translucent.

You can use both the onion part and the green part of the spring onions but reserve little for garnish.

Add bell peppers and saute for couple more minutes till they are slightly cooked but still crisp.

Now add the mixed sauces and stir for about 5-7 minutes till it all comes together.

If you like manchurian with more sauce, just double the ingredients for sauce

Toss the fritters in sauce and stir-fry on high heat for a few minutes to coat them well.

Remove from heat, garnish with spring onions.

Serve hot with fried rice or noodles.

Chocolate Brownies (a foolproof recipe)!

Monday, January 16, 2012

Chocolate Brownie

A delicate crisp crust enveloping an intensely chocolatey, wonderfully rich and dense brownie that is just as fudgy and moist.


Read More...


Brownie has a special place in my heart!

Chocolate Brownie

We had cats for most of my childhood. My grandmother was fond of cats so she always had at least one in the house. However, there was a period when we did not have any. Then, one day we heard meowing coming from our backyard and to our surprise, we found two kittens :-)! I named them Snowy, Browny since one was white, and the other was brown. I was very attached to Browny. I would play with him every day after school, feed him and pamper him. We shared this unknown bond of love. If I were not at home even for a day, he would stand in front of my door and meow. After few years on one day, Browny went missing and we never found him.

Chocolate Brownie

I was first introduced to brownies here in the US. Since it had the same name, I developed a special attachment to it. Every time I bake brownies, I take special care and interest in making’em. This post is a dedication to my lil cat Browny.

Chocolate Brownie

Brownies come in variety of textures. They are thick n fudgy while others are light and cake like. Brownies I make usually fall in between. They have a delicate, crisp crust enveloping a wonderfully rich, dense but moist brownie that is just fudgy enough. Symphony of chocolate, cocoa and more chocolate creates an intense chocolate experience that the chocolate lovers are sure to cherish. This amazingly rich brownie takes perfection with a deep chocolate flavor and heavenly taste that melts in your mouth.

When something is all about chocolate, it can only taste divine. This is just pure chocolate magic!

Chocolate Brownie


Chocolate Brownie

Makes - 10-12 Servings

Flour - 3/4th cup
Semi-sweet Chocolate - 2 cups
Cocoa Powder - 2 Tbsps
Butter - 5 tbsps
Eggs - 3
Sugar - 1 1/2 cups
Brown Sugar - 1/2 cup
Vanilla Extract - 1 tsp
Instant Coffee powder - 1 tsp
Baking Powder - 1 tsp
Salt - just a pinch

Pre-heat oven to 350 degree F. Line 8 x 8 pan with baking paper/parchment paper and butter the paper.

Lining the pan with baking paper makes it easy to remove brownies from the pan. You can remove them right out by lifting the paper.

Whisk together flour, cocoa powder, baking powder, salt, and set aside.

In a bowl, melt butter and chocolate.

You can substitute milk chocolate for semi-sweet chocolate but reduce the quantity of sugar, as milk chocolate is sweeter.

You can melt them by placing the bowl over a pot of simmering water, stirring until its melted completely. On the other hand, you can use a microwave to melt it. Let it cool for a few minutes.

While it cools, stir together sugar, eggs, vanilla extract and coffee powder.

Pour the chocolate mixture into the egg mixture. Stir until combined.

Add the flour mixture little by little and whisk to incorporate completely.

Pour into the prepared pan and bake for 25 minutes, or until a toothpick inserted in the center comes out clean.

Remove from oven and cool on a rack.Cut brownies and serve!